
AWS EKS with Toolchain via IaC
AWS Community Builder / Cloud Architect / IT Lead / MLOps
IT infrastructure should be simpler to automate. Working with AWS cloud we at GOD “Gesellschaft für Organisation und Datenverarbeitung mbH” are implementing a method of describing IT infrastructure using the Infrastructure as Code (IaC) methodology.
All businesses aim to make the best use of cloud infrastructure available. We have come to the conclusion that Kubernetes is better suited for this. Kubernetes’ job is to make the most efficient use of your infrastructure whilst ensuring that your containerized workloads are available and can scale as needed. Kubernetes takes all the great strengths behind containerization and provides a platform for deploying and managing them with greater ease.
Why Should We Use Kubernetes?
Kubernetes is an open-source project which has big communities, we can use it to run containerized applications anywhere without needing to change our operational tooling. As users and engineers of modern web applications, we expect them to be available 24 hours a day, 7 days a week, and to be able to deploy new versions of them many times a day. Wherever you install it, be it on your laptop, a cloud provider, or an on-premise data center, it provides automated deployments of your containerized applications with fully consistent environments. With Kubernetes, the days of building and testing locally, only to find your application behaves differently in test or production environments, are gone!
With time, we had to scale as a company and we decided to use several isolated Kubernetes clusters for each project. And we got the idea to create a template for the quick deployment of Kubernetes in the AWS cloud. Using the IaC via Terraform template for deploying Kubernetes and the necessary applications inside it, we achieved a stable and fast deployment of our cluster with all the necessary data.
Infrastructure as code (IaC), or programmable infrastructure, means writing code (which can be done using a high-level language or any descriptive language) to manage configurations and automate the provisioning of infrastructure in addition to deployments. This is not simply writing scripts but involves using tested and proven software development practices that are already being used in application development. For example version control, testing, small deployments, use of design patterns, etc. In short, this means you write code to provision and manage your server, in addition to automating processes.
The aim of this tutorial is to close off this gap and step through the setup of the Kubernetes cluster. At the end of the tutorial, we’ll end up with a Kubernetes cluster that looks like this:
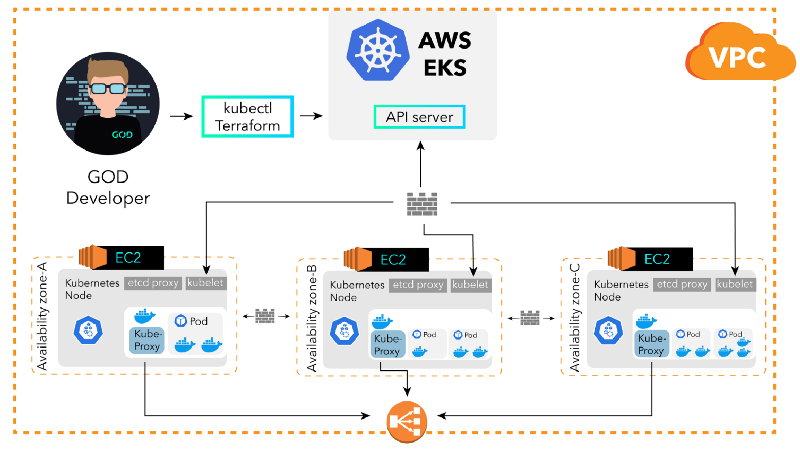
There is a number of articles on the Internet on how to deploy a Kubernetes cluster, but we were not able to find a document that would bring together all the pieces to setup up a production-ready cluster on AWS. The documentation is mostly there, but it’s a treasure hunt to track it down and work out how to make it work in each particular situation. This makes it particularly challenging for anyone embarking on their first Kubernetes pilot or making the step up from a local minikube cluster.
We suspect you are already familiar with Kubernetes. If you are new with Kubernetes, it is recommended you review the Kubernetes Basics tutorial and get yourself familiar with its key concepts.
We’re running Mac OS X with Homebrew, so all we need to run the following commands to get these installed:
$ brew update
$ brew install kubectl
$ brew install python3
$ easy_install pip
$ pip install awscli — upgrade — user
$ export PATH=~/.local/bin:$PATH
$ brew install terraform
$ brew install terragrunt
$ brew install direnv
Create the Cluster
Step 1: Clone the repository
$ git clone [https://github.com/god-dev-team/terraform-eks-env-workshop](https://github.com/god-dev-team/terraform-eks-env-workshop)
Step 2: Prerequisites needed for creating a cluster
eks-vpc/backend.tf you will need a change.
It will also use an S3 bucket that will be used as a remote store for our Terraform state. This allows multiple users to work with one set of Infrastructure as Code without causing conflicts.
You will also need to change with your .envrc file (direnv tool — Load/unload environment variables based on your path)
Step 3: Change variables based on your needs.
Next, we need to set a couple of environmental variables:
eks-vpc/variables.tf like cluster name, AWS region, VPC preferences, etc.
in eks-vpc/locals.tf you need set map_users for managing your cluster.
Step 4: Stand-up the cluster
Now we can create our cluster.
$ cd eks-vpc
$ terraform init
$ terraform plan
$ terraform apply
It will take between 10 and 15 minutes for your cluster to become available.

So here we have a scalable cluster and created a network which includes:
It will create a policy and role to be used by the cluster-autoscaler using the public Helm chart
Has a node of size t2.medium in each of the specified availability zones
Uses a private network topology, meaning that all the nodes have private IP addresses and are not directly accessible from the public Internet
Toolchain for Kubernetes
In order to avoid creating a new infrastructure for every project, we have created a single template for creating a cluster with all applications via helm charts. This includes applications such as Jenkis, Grafana, Argo, Keycloak, Nexus Repository, etc.
From the previous tutorial, we have a ready-to-use Kubernetes cluster, which we will use as a basis. In this part, we will describe how you can install applications into our cluster.
Since we have configured direnv application in our folder we can proceed to install the rest.

Step 1: Need Setup a FQDN that will be used for the cluster in Route53
EKS cluster that we will setup will use a FQDN hosted in Route53 to expose service endpoints and the API control plane. You could register a new FQDN or transfer an existing FQDN. AWS has a full step-through for each of these options:
Step 2: Change variables as your preference
charts/variables.tf here you will need to provide your email for cert-manager, AWS region, and domain.
charts/variables-modules.tf here you will need to provide applications you want to install into your Kubernetes
Step 3: Install Application via Helm Charts
We can now install all the applications.
$ cd charts
$ terraform init
$ terraform plan
$ terraform apply
This approach to creating infrastructure gave us an opportunity to simplify the creation of an infrastructure in a few clicks.
Summary
Using this tutorial, we have created a Kubernetes cluster with a good set of default security settings, and then wrapped a few applications that are commonly used by a typical IT company.
This is just a simple illustration of the rich benefits Kubernetes can bring to your developers and your DevOps capabilities when included as part of your toolchain!
In the next article, we will show you how to build a complete pipeline on our Kubernetes cluster using steps such as build, test, and deploy in our environment using applications such as Jenkins, GitLab CI/CD, CircleCi, and Argo.
P.S. This article may differ from what is actually in our repository as the code is updated frequently.